
Happy Halloween to you all!
Here's my video showing you how to use the new 7Gypsies punch with ribbon weaving on some cute birthday cards. I hope you enjoy it!
Supplies:
The new 7Gypsies Border Punch
Ribbon and Colored Floss
Cards
Prima Flowers
Tim Holtz Grungeboard (heart)
Distress Ink (Fired Brick, Vintage Photo, Spiced Marmelade)
Blending Tool
Buttons
"Happy Birthday" and butterfly stamps
Don't forget to get your own 7Gypsies supplies today! It's the last day of our 7Gypsies week so make sure you check out the sales :).
Have a fabulous Halloween!
~ Kristin
Saturday, October 31, 2009
7gypsies Shadow Box by Wendy
 I have a quick but lovely home decor project for you, using the luscious 7gypsies products you can find @ BlueMoonScrapbooking.com, or even in your Stash!
Here's what I used:


+ some of my own vintage finds!
Wendy ;]
Friday, October 30, 2009
7Gypsies Border Punch Birthday Cards
Hello again :).
So, in honor of 7Gpysies week, I will have a video tomorrow on how to make some cute birthday cards with the help of their new border punch. But for now, here's a sneak peak :). I'll list all the supplies I used on tomorrow's video post. Hope you enjoy it!


So, in honor of 7Gpysies week, I will have a video tomorrow on how to make some cute birthday cards with the help of their new border punch. But for now, here's a sneak peak :). I'll list all the supplies I used on tomorrow's video post. Hope you enjoy it!

Have a great All Hallow's Eve! :)
~ Kristin
Tag Mini Album by: ~Marion~
Hi everyone! Here's another video with me using my new favorite tool the 7Gypsies border punch! I'm sorry the video is not of great quality, I was having some issues with my camera so I had to use my old one. We're so sad that 7Gypsies week is almost over, so make sure to check out the Blue Blog for a chance to win some awesome goodies!! Enjoy!
Supplies used:
7Gypsies Border Punch
Tim Holtz Distress Ink
Prima Flower
K&Company Ques Sera Sera Stamp set
Jewelry Wire
Paper tags
Supplies used:
7Gypsies Border Punch
Tim Holtz Distress Ink
Prima Flower
K&Company Ques Sera Sera Stamp set
Jewelry Wire
Paper tags
Thursday, October 29, 2009
A week long 7gyspsies even...
Today I played with the 7gypsies Border Punch along with some cool products.
 I wanted my paper to resemble a post stamp along the border. So I went to town and punched it out using the Border Punch Kit.
 To get this border I used the circle punch on the border punch. I used a pencil to draw a line through the center of circle so I could get the correct setting each time. You can you see it here?
 Here you go-that's better! Each punch I just moved my paper to the right and kept going until the entire page was punched. This is a really easy punch to use. There are different 5 different hole punches that interchange on the machine. and they are ON SALE THIS WEEK!!!! Check them out here!!!
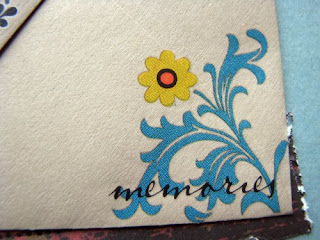
 Inside this little envelope is a letter I wrote to my son on his first day of kindergarten. I decorated the plain envelope with the 7gypsies rub-ons--which I have to say are the easiest to rub off-they come off smooth and easy...just like butter! You can even go right over the top of another rub-on as I did on the flower and the word "memories." I sealed the envelope with a 97% complete sticker.
 Here's a close-up of the rub-ons over another.
I used the punch once again on this border for my picture. This is the ATC punch included in the border punch system, but I like the look of it on my paper, gives it a fun edge and I finished off the paper with more rub-ons. Also notice the tag-another great idea by the 7gyspies people. They really do make the coolest things.

Take the punch out of the box and play with it...you know the box it comes in could be altered too!
~Melanie
 I wanted my paper to resemble a post stamp along the border. So I went to town and punched it out using the Border Punch Kit.
 To get this border I used the circle punch on the border punch. I used a pencil to draw a line through the center of circle so I could get the correct setting each time. You can you see it here?
 Here you go-that's better! Each punch I just moved my paper to the right and kept going until the entire page was punched. This is a really easy punch to use. There are different 5 different hole punches that interchange on the machine. and they are ON SALE THIS WEEK!!!! Check them out here!!!
 Inside this little envelope is a letter I wrote to my son on his first day of kindergarten. I decorated the plain envelope with the 7gypsies rub-ons--which I have to say are the easiest to rub off-they come off smooth and easy...just like butter! You can even go right over the top of another rub-on as I did on the flower and the word "memories." I sealed the envelope with a 97% complete sticker.
 Here's a close-up of the rub-ons over another.
I used the punch once again on this border for my picture. This is the ATC punch included in the border punch system, but I like the look of it on my paper, gives it a fun edge and I finished off the paper with more rub-ons. Also notice the tag-another great idea by the 7gyspies people. They really do make the coolest things.

Take the punch out of the box and play with it...you know the box it comes in could be altered too!
~Melanie
Wednesday, October 28, 2009
Halloween 7Gypsies Photo Display video
Here's a short video with the details of my photo display, I hope you enjoy it! Go get one yourself so you can decorate for every season or have a great place to hold all your cards :).
I will be posting a video project with the new 7Gypsies border punch on Saturday, so stop by again soon, and have a happy halloween!
~ Kristin
I will be posting a video project with the new 7Gypsies border punch on Saturday, so stop by again soon, and have a happy halloween!
~ Kristin
Halloween 7Gypsies Photo Display
Happy 7 Gypsies Week everyone!
I have some photos today of a Halloween project I recently made to decorate my new 7Gypsies Photo display. I will post a short video later today so you can see all the details, but for now, let me tell you what I worked with!


I used a variety of great products to create these Fall and Halloween-themed double-sided cards to hang on my display. Each display comes with 25 small clips to attach photos, cards, embellishments and other items you have laying around :). My favorite products that I used on this project were zing embossing powder (so colorful!), perfect pearls powder by Ranger (metallic colors), lots of stamps and distress ink by Tim Holtz, thickers, and ribbon.


Go on over to BlueMoonScrapbooking.com and get yourself a great 7Gypsies photo display, it's perfect for all occasions! I'll have a short video up later today to show you the details on my Halloween and Fall cards. Don't forget to check out all the fabulous giveaways and sales this week, too!
See you all later! :)
~ Kristin
Tuesday, October 27, 2009
Joli Bebe 7Gypsies photo carousel card by: ~Marion~
Hi everyone! Our exciting 7Gypsies week continues! Here is a little photo carousel card I made, I hope you like it! Don't forget to visit the Blue Blog to take advantage of the awesome freebies they are giving away daily!
Supplies:
7Gypsies Photo Carousel
Prima Flower
7Gypsies Border punch
Supplies:
7Gypsies Photo Carousel
Prima Flower
7Gypsies Border punch
Monday, October 26, 2009
Melanie's Monday Column 10-26-09
At BlueMoon Scrapbooking we are all celebrating 7 Gypsies all week long! I'm sure you all have their fun, whimsy products stashed in your scrapbooking supplies somewhere unless you are like me and use them the second you get them. Either way, we are going to get those products out this week and create with them, if you need more...I know just the place!
One of the first kits I had purchased from BlueMoon was filled with 7 Gypsies products. I created this layout in less than 1 hour. The paper is so pretty and full of texture. Do you see the black and white border paper-it's a flocked paper that's really soft-certainly not like any other plain paper, talk about texture!

I started cutting the decorative elements out of the 7 Gypsies paper (like I usually do) and in my kit I had a really cool mirror. I cut the inner part out from the paper and layered it over the mirror, pretty cool frame! Finished it off with a flower and a ring dangle....
 ...which is one of my favorite 7 Gypsies products. They are really pretty. You can take a look at them here ring dangles. They are available in a couple colors and styles. They are so cute you could make jewelry out of them, put them on your key chain with your car keys. Who knows the possibilities are endless. I think they are really cute hanging down the spine of a scrapbook album.
 Next, I used the decorative Metal Page Edges, cut them in half, placing a piece 7 Gypsies Gaffer Tape in between them. It's so pretty!
 Check out the the little heart on the crown, it was clear, I used 1 drop of alcohol ink and changed it to match my page. Pretty cool trick.

There's a ton of cool products in the store, even some 7 gypsies kits (you know I love kits!). Make sure you stop back everyday this week, the design team is out to inspire YOU!!!!
Have a create day!
~Melanie
One of the first kits I had purchased from BlueMoon was filled with 7 Gypsies products. I created this layout in less than 1 hour. The paper is so pretty and full of texture. Do you see the black and white border paper-it's a flocked paper that's really soft-certainly not like any other plain paper, talk about texture!

I started cutting the decorative elements out of the 7 Gypsies paper (like I usually do) and in my kit I had a really cool mirror. I cut the inner part out from the paper and layered it over the mirror, pretty cool frame! Finished it off with a flower and a ring dangle....
 ...which is one of my favorite 7 Gypsies products. They are really pretty. You can take a look at them here ring dangles. They are available in a couple colors and styles. They are so cute you could make jewelry out of them, put them on your key chain with your car keys. Who knows the possibilities are endless. I think they are really cute hanging down the spine of a scrapbook album.
 Next, I used the decorative Metal Page Edges, cut them in half, placing a piece 7 Gypsies Gaffer Tape in between them. It's so pretty!
 Check out the the little heart on the crown, it was clear, I used 1 drop of alcohol ink and changed it to match my page. Pretty cool trick.
There's a ton of cool products in the store, even some 7 gypsies kits (you know I love kits!). Make sure you stop back everyday this week, the design team is out to inspire YOU!!!!
Have a create day!
~Melanie
7Gypsies week Carousel Pocket Tutorial ~Marion~
Hi everyone! Wow what an exciting week at bluemoonscrapbooking.com! 7Gypsies Sales, give aways, videos galore! It's going to be a ton of fun! So, today I'm kicking off the week with a video tutorial for your 7Gypsies photo carousel and the border punch. Hope ya enjoy it! Happy 7Gypsies week!
Supplies used:
7Gypsies Photo Carousel
7Gypsies Border Punch
Featured items:
7Gypsies Binderie
Supplies used:
7Gypsies Photo Carousel
7Gypsies Border Punch
Featured items:
7Gypsies Binderie
Monday, October 19, 2009
Melanie's Monday Column 10-19-09
It's time for a all new kit, Crow's Nest and it's available now!
I split the kit up into a couple different projects this month. I have a couple layouts, an altered home decor' piece and a really cool canvas.
This week I'll share my layout called Sweet Sunny Smile. When I seen the Prima Sunflowers in the kit, I knew I had the perfect photos to go along with the flowers. These flowers would be really pretty on the front of a mini book or an altered table top decoration for fall...so many possibilities!
 I cut most of the paper elements out from a sheet of the Basic Grey paper, using them throughout my page. To embellish the cutouts I used the Jenni Bowlin circle letters , they are a perfect fit along with the Maya Road leaf pins. I attached a couple pop-dots to the back and bent the paper a bit (to do this I just roll the paper on a pencil to get a nice curve). Gotta love texture on your page!

 Included in the kit is 2 ColorBox Chalk Cats Eye Inks in Yellow Citrus and Pumpkin Spice. For my photo mat I added my picture to a piece of plain white cardstock, tore the edges and inked with both colors and then spritz a bit of green glimmer mist for the lovely glimmer!
 If you notice, on the upper left hand side of my picture here, I did some masking. This was done to the entire layout before anything was added. I felt the paper was just a bit to orange and wanted to tone it down a bit by using some distress inks and a mask (the mask I used was one of the elements I cut out--as seen in the first couple photos. I flipped it over and used the back side for the mask.)
 Again, I just want to point out the flower, I just love the texture of them on this layout.
 One of my favorite pieces in the kit is the Tim Holtz Metal Frame. Since my layout had to do with my DD's smile, what a perfect word to add.

Thanks for stopping on this week...
Here's a peek of next week:

~Melanie
I split the kit up into a couple different projects this month. I have a couple layouts, an altered home decor' piece and a really cool canvas.
This week I'll share my layout called Sweet Sunny Smile. When I seen the Prima Sunflowers in the kit, I knew I had the perfect photos to go along with the flowers. These flowers would be really pretty on the front of a mini book or an altered table top decoration for fall...so many possibilities!
 I cut most of the paper elements out from a sheet of the Basic Grey paper, using them throughout my page. To embellish the cutouts I used the Jenni Bowlin circle letters , they are a perfect fit along with the Maya Road leaf pins. I attached a couple pop-dots to the back and bent the paper a bit (to do this I just roll the paper on a pencil to get a nice curve). Gotta love texture on your page!
 Included in the kit is 2 ColorBox Chalk Cats Eye Inks in Yellow Citrus and Pumpkin Spice. For my photo mat I added my picture to a piece of plain white cardstock, tore the edges and inked with both colors and then spritz a bit of green glimmer mist for the lovely glimmer!
 If you notice, on the upper left hand side of my picture here, I did some masking. This was done to the entire layout before anything was added. I felt the paper was just a bit to orange and wanted to tone it down a bit by using some distress inks and a mask (the mask I used was one of the elements I cut out--as seen in the first couple photos. I flipped it over and used the back side for the mask.)
 Again, I just want to point out the flower, I just love the texture of them on this layout.
 One of my favorite pieces in the kit is the Tim Holtz Metal Frame. Since my layout had to do with my DD's smile, what a perfect word to add.
Thanks for stopping on this week...
Here's a peek of next week:

~Melanie
Friday, October 16, 2009
Platinum UTEE on Prima Flowers {Marion}
Hi everyone here is a new video on how to make some really neat grungy flowers! Enjoy!
Products:
Platinum UTEE By: Ranger
Tim Holtz Distress Embossing Pad
White Prima FLowers
Tattered Angels Glimmer Mist in Tattered Leather
Products:
Platinum UTEE By: Ranger
Tim Holtz Distress Embossing Pad
White Prima FLowers
Tattered Angels Glimmer Mist in Tattered Leather
Monday, October 12, 2009
Melanie Monday Column 10-12-09
"Together" is my last layout from the Shining Madonna kit.
 To get the structure of this layout, I simple used a spare piece of 12x12 diecut paper and traced the pattern onto a piece of paper included in the kit and cut it out. I painted it with the Tim Holtz Antique Lined Crackle Paint. I used a heat embossing tool after the paint started to "crack." Doing that really makes the paper bend nicely and give it more texture and oomph to the page. After the paint was dry, I used some brown distress ink and the ink blending tool to get into the cracks and around the edges. The result I wanted to get was so the paper looked like the concrete bridge in my photo-which I did, the distress ink really gives it the perfect finish.
I cut the blue paper to match the diecut sheet and glued them together, added it to a piece of brown cardstock to really set the page. I also distressed the edges of the brown paper to match the look of my page. I use a Heidi Swapp distressing tool.

After attaching my photo, I sewed the canvas Pink Paislee tag right to the picture. Sewing looks great on scrapbook pages and is such a simple way to add texture! I think canvas looks best with frayed edges so all I did was pull a couple strings to get that look. The truth is I really don't sew on clothes, only paper. I bought this sewing maching and it is the best $30 I ever spent (it was a really good sale price at that time). So, if you don't have a sewing machine and want one to play around with I would recommend this one. Actually now that I think of it I did make pillows and curtains with this machine. Ok, back to the layout...
I love adding flowers to my page. Since Prima does a wonderful job of making their flowers so full, I went ahead and pulled each flower apart to get all the layers and spread them around my page, adding some Prima Pebble for flower centers.
 I usually try to put a title on each page, these 7 gypsies letters are so cute and match just perfect! I used pop-dots on some of the letters to make them stand out so the title is not so flat looking and to match all the texture on my page.

The butterflies are the perfect embellishment for this page, they are so cute and dimensional. You must see these butterflies in person. They have 4 layers on each of them. To make them look like they are fluttering about, I used the Prima bling that comes in the swirl packs.

I really enjoyed the Shining Madonna kit. It's no wonder why this kit is so popular, you get a ton of mixed products that match perfectly and the embellishments are so beautiful!
I hope you enjoy your week and be creative!
~Melanie
 To get the structure of this layout, I simple used a spare piece of 12x12 diecut paper and traced the pattern onto a piece of paper included in the kit and cut it out. I painted it with the Tim Holtz Antique Lined Crackle Paint. I used a heat embossing tool after the paint started to "crack." Doing that really makes the paper bend nicely and give it more texture and oomph to the page. After the paint was dry, I used some brown distress ink and the ink blending tool to get into the cracks and around the edges. The result I wanted to get was so the paper looked like the concrete bridge in my photo-which I did, the distress ink really gives it the perfect finish.
I cut the blue paper to match the diecut sheet and glued them together, added it to a piece of brown cardstock to really set the page. I also distressed the edges of the brown paper to match the look of my page. I use a Heidi Swapp distressing tool.

After attaching my photo, I sewed the canvas Pink Paislee tag right to the picture. Sewing looks great on scrapbook pages and is such a simple way to add texture! I think canvas looks best with frayed edges so all I did was pull a couple strings to get that look. The truth is I really don't sew on clothes, only paper. I bought this sewing maching and it is the best $30 I ever spent (it was a really good sale price at that time). So, if you don't have a sewing machine and want one to play around with I would recommend this one. Actually now that I think of it I did make pillows and curtains with this machine. Ok, back to the layout...
I love adding flowers to my page. Since Prima does a wonderful job of making their flowers so full, I went ahead and pulled each flower apart to get all the layers and spread them around my page, adding some Prima Pebble for flower centers.
 I usually try to put a title on each page, these 7 gypsies letters are so cute and match just perfect! I used pop-dots on some of the letters to make them stand out so the title is not so flat looking and to match all the texture on my page.
The butterflies are the perfect embellishment for this page, they are so cute and dimensional. You must see these butterflies in person. They have 4 layers on each of them. To make them look like they are fluttering about, I used the Prima bling that comes in the swirl packs.

I really enjoyed the Shining Madonna kit. It's no wonder why this kit is so popular, you get a ton of mixed products that match perfectly and the embellishments are so beautiful!
I hope you enjoy your week and be creative!
~Melanie
Sunday, October 11, 2009
What do you do when you come to the end of a kit?
I had a few leftover pieces from the Shining Madonna kit and I really wanted to use them. They included a few Prima flowers, the Prima Pebbles and 1 butterfly. I know they could have been easily set aside but not me, I like to use each and every piece.
I recycled a Prima Glass bottle, (remember those first ones that came out, filled with 500 flowers?)

This is a quick handmade flower, using a circle piece of paper and with a couple folds, you end up with a flower (I'll post how in a bit)
 Here's a close-up of the bottle. I used Tim Holtz Rock Candy as the first layer. After letting it dry and crack. I used some Alchol inks in Stream and Bottle to get the finish.
 I used the Rock Candy on the tag once again, I just love the look and texture you get from the product.


I finished it off with pink tulle. Now's a cute little accessory for a shelf in my scrapbook room.
I'll be posting the 4th layout from the Shining Madonna kit on Monday, so check back then. And think fall and Halloween! I have some really cool products and stamps to play with. I hope to inspire you to get of the inks, glimmer mists and just create!
Enjoy the rest of your weekend!
~Melanie
I recycled a Prima Glass bottle, (remember those first ones that came out, filled with 500 flowers?)

This is a quick handmade flower, using a circle piece of paper and with a couple folds, you end up with a flower (I'll post how in a bit)
 Here's a close-up of the bottle. I used Tim Holtz Rock Candy as the first layer. After letting it dry and crack. I used some Alchol inks in Stream and Bottle to get the finish.
 I used the Rock Candy on the tag once again, I just love the look and texture you get from the product.

I finished it off with pink tulle. Now's a cute little accessory for a shelf in my scrapbook room.
I'll be posting the 4th layout from the Shining Madonna kit on Monday, so check back then. And think fall and Halloween! I have some really cool products and stamps to play with. I hope to inspire you to get of the inks, glimmer mists and just create!
Enjoy the rest of your weekend!
~Melanie
Thursday, October 8, 2009
Basic Grey Acrylic Stamp Goodness from Wendy
A cute idea for your Basic Grey clear stamps -


The possibilities are endless - birthday party, tea party, or just for fun!
You can find all the Basic Grey pps, die cuts and stamps I used over @ BlueMoonScrapbooking.com ;]
Colorbox Ink
Basic Grey Lemonade Die Cuts
Basic Grey Lemonade PP Picnic Table
Basic Grey Stamps


The possibilities are endless - birthday party, tea party, or just for fun!
You can find all the Basic Grey pps, die cuts and stamps I used over @ BlueMoonScrapbooking.com ;]
Colorbox Ink
Basic Grey Lemonade Die Cuts
Basic Grey Lemonade PP Picnic Table
Basic Grey Stamps
Subscribe to:
Posts (Atom)


